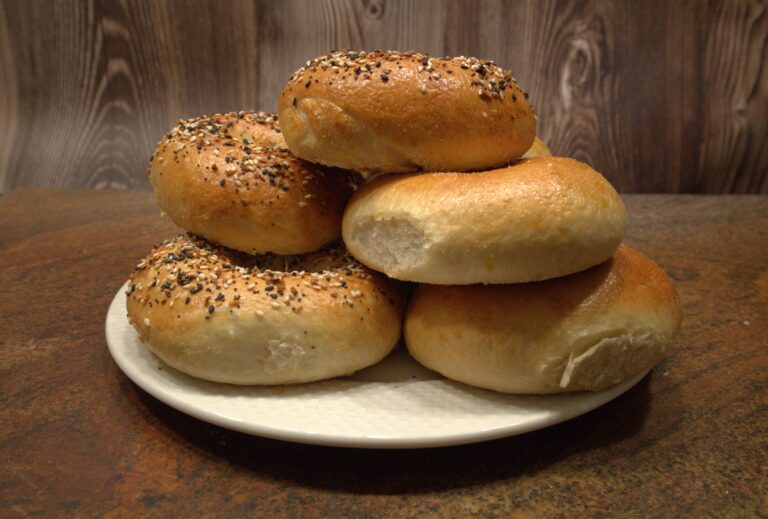
Soft Sourdough Sandwich Bread
Here is a wonderful soft sourdough sandwich bread recipe you can use with your existing starter. This recipe yields a deliciously tender and flavorful loaf, perfect for sandwiches or toast. Whether you’re a seasoned baker or just starting, this recipe will surely become a favorite in your kitchen. Enjoy the process and the delightful aroma of freshly baked bread!

Benefits of Sourdough Bread
Easier Digestion: The fermentation process breaks down gluten, making it easier to digest for some people with gluten sensitivities.
Nutrient Absorption: Sourdough fermentation increases the availability of nutrients like B vitamins, iron, and magnesium, making them easier for your body to absorb.
Lower Glycemic Index: Sourdough bread has a lower glycemic index than other breads, which causes a slower rise in blood sugar levels.
Rich in Probiotics: The natural fermentation process introduces beneficial bacteria, which can support gut health.
Longer Shelf Life: The acidity of sourdough helps prevent mold growth, giving it a longer shelf life without preservatives.
Enjoying sourdough bread can be a delicious way to support your overall health and well-being!

Soft Sourdough Sandwich Bread
Ingredients:
500g all-purpose flour
250ml water
50g unsalted butter, softened
50g sugar
1 egg, room temperature
10g salt
200g active sourdough starter
3g active dry yeast
Mix the Ingredients: In a large bowl, combine the warm water, active sourdough starter, sugar, melted butter, flour, and salt. Mix until a rough dough forms.
Knead the Dough: Turn the dough out onto a lightly floured surface and knead for about 10 minutes until it becomes smooth and elastic. *Add more flour in Tablespoon increments until you can handle the dough and it’s not sticky.
First Rise (Bulk Fermentation): Place the dough in a lightly greased bowl, cover it with a damp cloth, and let it rise at room temperature for 4-6 hours, or until it has doubled in size.
Shape the Dough: After the first rise, punch down the dough to release any air bubbles. Shape it into a loaf or your desired shape and place it in a greased loaf pan or on a baking sheet.
Second Rise (Final Proof): Cover the shaped dough with a damp cloth and let it rise for another 2-4 hours, or until it has doubled in size again.
To refrigerate your sourdough for fermentation, follow these steps:
First Rise (Bulk Fermentation): Let the dough undergo its first rise at room temperature until it has doubled in size. This usually takes 4-6 hours, depending on the temperature and the activity of your starter.
Shape the Dough: After the first rise, gently punch down the dough to release any air bubbles. Shape it into a loaf or your desired shape.
Second Rise (Cold Fermentation): Place the shaped dough into a greased loaf pan or a proofing basket (banneton). Cover it with plastic wrap or a damp cloth.
Refrigerate: Transfer the covered dough to the refrigerator. This is the cold fermentation stage, where the dough will slowly rise and develop more complex flavors. Refrigerate the dough for 12-24 hours. The longer it ferments, the more pronounced the sourdough flavor will be.
Bake: When you’re ready to bake, preheat your oven to the required temperature. Remove the dough from the refrigerator and let it sit at room temperature for about 30 minutes while the oven heats up. Bake according to your recipe’s instructions.
Cold fermentation in the fridge allows the dough to develop a deeper flavor and a better texture.
Continue your baking…
Preheat the Oven: Preheat your oven to 375°F (190°C).
Bake: Bake the bread in the preheated oven for 30-35 minutes, or until the crust is golden brown and the bread sounds hollow when tapped on the bottom. Oven heat can fluctuate, so some loaves of bread may require up to 60 minutes of baking. Always use a thermometer to ensure the center of the loaf reaches between 195°F and 200°F for perfect doneness.
Cool: Allow the bread to cool on a wire rack before slicing and serving.
Allowing bread to cool before cutting is essential for several reasons:
Texture Development: As the bread cools, the interior continues to set, ensuring a proper crumb structure. Cutting too soon can result in a gummy or doughy texture.
Flavor Enhancement: Cooling allows the flavors to fully develop and meld, providing a richer taste experience.
Moisture Distribution: Cooling helps redistribute moisture throughout the loaf, preventing it from becoming dry or unevenly textured.
By letting your bread cool, you ensure a better texture, flavor, and overall quality.
* When making bread, the amount of flour needed can vary due to differences in hydration levels required by different types and brands of flour. Here’s why:
Hydration Levels and Flour Types
Protein Content: Flours with higher protein content, like bread flour, absorb more water compared to lower protein flours, like all-purpose flour. This means recipes using bread flour might need more water to achieve the same dough consistency.
Brand Variations: Different brands of flour can have varying levels of moisture and protein, even within the same type of flour. This can affect how much water the flour absorbs and, consequently, how much flour you need to add to achieve the desired dough texture.
Environmental Factors: Humidity and temperature can also impact flour hydration. In humid conditions, flour can absorb moisture from the air, requiring less water in the recipe. Conversely, in dry conditions, you might need to add more water.
Adjusting Flour in Recipes
When following a bread recipe, it’s important to adjust the amount of flour based on the dough’s consistency rather than strictly adhering to the measurements. Here are some tips:
Start with Less Flour: Begin with the lower end of the flour range suggested in the recipe. Gradually add more flour as needed until the dough reaches the desired consistency.
Feel the Dough: The dough should be slightly sticky but not overly wet. It should come together into a smooth, elastic ball that’s easy to handle.
Add Flour Gradually: If the dough is too sticky, add flour a little at a time, kneading well after each addition until the dough feels right.
By understanding the hydration needs of different flours and adjusting accordingly, you can achieve the perfect dough consistency for your bread.


Soft Sourdough Sandwich Bread
Equipment
- Existing Sourdough Starter
- mixer
- 0ven
- food temperature probe
Ingredients
- 200 g active sourdough starter
- 500 g bread flour
- 250 g water warm
- 50 g butter unsalted, softened
- 50 g sugar
- 10 g salt fine sea
- 1 large egg
Instructions
- Mix the Ingredients: In a large bowl, combine the warmwater, active sourdough starter, sugar, melted butter, flour, and salt. Mixuntil a rough dough forms.
- Knead the Dough: Turn the doughonto a lightly floured surface and knead for about 10 minutes until it becomes smooth andelastic. *Add more flour in Tablespoon increments until you can handle doughand it’s not sticky.
- First Rise (Bulk Fermentation): Place the dough in a lightly greasedbowl, cover it with a damp cloth, and let it rise at room temperature for 4-6hours, or until it has doubled in size.
- Shape the Dough: After the first rise, punch down thedough to release any air bubbles. Shape it into a loaf or your desired shapeand place it in a greased loaf pan or on a baking sheet.
- Second Rise (Final Proof): Cover the shaped dough with a dampcloth and let it rise for another 2-4 hours, or until it has doubled in sizeagain.
- Preheat the Oven: Preheat your oven to 375°F (190°C).
- Bake: Bake the bread in the preheated ovenfor 30-35 minutes, or until the crust is golden brown and the bread soundshollow when tapped on the bottom. Oven heat can fluctuate, so some loaves ofbread may require up to 60 minutes of baking. Always use a thermometer toensure the center of the loaf reaches between 195°F and 200°F for perfectdoneness.
- Cool: Allow the bread to cool on a wire rack beforeslicing and serving.
Video
Making and eating soft sourdough sandwich bread is a delightful experience for several reasons. Sourdough bread is easier to digest due to the fermentation process, which breaks down gluten and increases nutrient availability. It also has a lower glycemic index, helping to maintain stable blood sugar levels. The long fermentation process enhances the flavor, giving the bread a unique tangy taste, while the texture remains soft and tender, perfect for sandwiches and toast. Baking your “own” bread allows you to control the ingredients, ensuring a healthier and more natural product without preservatives or additives. Additionally, the process of making sourdough bread is rewarding and therapeutic, and the aroma of freshly baked bread filling your home is a bonus. Enjoy the delicious taste and numerous benefits of homemade soft sourdough sandwich bread!
Download your printable recipe with all the baking tips included below.
Thank you for reading! We appreciate your support and interest. Come back for more farm-to-table recipes, slow-living tips, and farm-life ideas. Don’t forget to subscribe to our newsletter, below, so you won’t miss any posts. Please leave a comment, we would love to hear from you.
Don & Kirsten